Wednesday, July 27, 2011

Do It Yourself Secial Event Hair-The Up Style

O.K. You are prepped and curled and now you are ready to pin in to a style. This first style is a side ponytail look.
 With both hands smooth all the hair to one side. Hold it there with one hand. With your other hand push bobby pins in to the style in an up and down placement.
Pushing pins in vertically.

It doesn't have to be too tight. You are going to twist the hair tight and pin it at the side to give it more support.


Grab a nice hunk of the side hair and divide it in to two sections and twist together. Once you have finished the twist, tuck the ends up under the twist and pin.
 Twisting
Tucking and pushing pin in to the style to hold.
 Take the rest of the hair and divide it in to two parts and twist together.
Tuck the twist up and pin. Pin all around to secure.
Now spray it to death with some finishing spray. Remember that it is o.k. to let some strands hang down. This relaxed look is in style and will look really romantic.

Mary

Tuesday, July 26, 2011

Do It Yourself Secial Event Hair-Setting the Hair

If you haven't prepped your hair then please go back to part one of this series and do so.
Otherwise you are ready to set your hair. You CAN use hot rollers but this technique using a curling iron will give you a fantastic curl pattern that will be consistent and last longer. You might even decide to leave your hair down!
To get started you need a few supplies. You need a very hot 1/2 in. barrel curling iron. Really any size curling iron will do, this just happens to be my favorite. Clips are very necessary. I prefer the long clips shown above but you can also use bobby pins. Lastly you need a good shaping hair spray. It should be an aerosol and it should NOT be a finishing spray. I don't really have a favorite because they all seem to do about the same thing. I will let you know when I find one that stands out.
Get your iron nice and hot. Then grab a hunk of hair from the top of your head. It doesn't have to be parted nicely or measured. Just know that the larger hunk you take, the larger and looser the curls will be. 
Holding the hair straight up curl this section. The best way to curl is to start the iron mid section and wrap in down to the base, slowly adding the ends as you release and curl. If this makes absolutely no sense to you then just start curling at the ends and go up.

When the curl is really warm slowly remove the iron leaving the curl in tact. Hold the curl with one hand and get ready to pin with the other. It does not have to look great or feel really tight. You may have to use a couple of pins the first time you do this to get it to stay until you have a bit more practice.
Insert the pin.
This is what it should look like.

Grab a second hunk of hair behind the first and do the same thing. 
Curl.

Hold.
Pin.

Now do two on each side. 
Grab.
Curl.
Pin.
You can do three on each side too if you have more hair.
You CAN continue this throughout the whole head. I usually opt for the lazy approach and just do a few banana curls on the bottom because the curls on top will be so awesome it won't matter much. You can choose what you want to do. Setting the whole head will give you more control.

Here are my banana curls. They are also called spiral curls.
Now you can spray the hair really well. You must let the curls cool completely before you taking them out.
Shake them up with your hands.
Here is a head full of beautiful curls ready to be finished or made in to an up style. You can brush them out to get a softer look.

Do It Yourself Secial Event Hair-Prepping the Hair

So you want to do your own hair. I can respect that. Not all occasions call for my assistance. I am graciously going to share a few tips with you so that you can create your own special event look. The first thing that you should know is that prepping the hair is the most important thing in the up style. You must start with clean hair.
This is my beautiful model Allison. Her hair is clean and dry. I do not use many hair products (gasp) because so many are completely unnecessary. I suggest a light creama gel. It is nice to give the hair a little body and holding power before you start. If I am going to use a product I usually prefer Alterna's Creama Gel for all hair types or Alterna's Thickening Compound for fine hair. Both products have organic ingredients in them although I doubt they are completely organic. It is really hard to find a quality hair styling product that is organic. If you know of a good one please do tell.
Creama Gel

You can get this from your favorite salon professional.
So please shampoo and condition your hair. Next use a light hold styling aide and blow dry until completely dry. It is good to blow dry in a downwards motion to keep the hair as smooth as possible. If you have really curly hair I suggest using an oil and flat iron. You don't want to iron the hair in to a finished style but you want to just work the oil in to the hair to give it a little shine and slip. I recommend Alterna's Spray Shine for this. It is the best spray shine I have ever found.
This spray shine is great for all hair types. It will not leave the hair feeling heavy or oily. It's a perfect finisher.

Now that your hair is clean, dry and shiny you can move on to setting the hair.

Sunday, July 24, 2011

The Facial Hair Dilema

 
This is my everyday reality: driving down the road, rocking out to Bad Religion, minding my own business and then I look in the mirror in full sun and curse! Curse you whoever is responsible for making me look like Sasquatch! I never notice the little demons until I am in the car. I am sure that secretly everyone I know refers to me as the "lady who plucks her beard at red lights."

I am pretty sure that lots of you feel my pain because I get asked weekly what to do about facial hair. So I am going to give you my best advice on the topic. There are several options that work well.

But first lets talk about THINGS TO AVOID!
1. Do not use a bleaching agent on your facial hair. You might think it helps but it really just makes you look like Santa Clause. You are just making the problem more noticeable.
2. Do not attempt to remove hair while taking acne medication. You will tear off your skin and cause permanent damage.
3. Do not remove hair 1 hour before a big event. It is best to give yourself 24-48 hours to get back to normal.
4. Do not go tanning after hair removal. Actually, don't go tanning at all. It is bad for you.
5. I suggest that you stay away from the hair removal cream as well. It doesn't remove the hair at the root and will cause your regrowth to be more noticeable. 
6. Do not shave your facial hair. When you use a razor it cuts the hair off straight across which has a tendency to look like a black head. Waxing removes the hair at the root so it will grow back with a nice point instead of the blunt edge.


Here are some great options for temporary hair removal:

A. Have your face waxed at the salon or spa. This costs anywhere from 10-25$ and has to be done about every 3-4 weeks. It is worth the money because your waxing specialist will be able to get things you can't see(except when you are driving). This may feel embarrassing to you but it really is pretty normal. Chances are your stylist has been trying to figure out how to tell you that you need a facial wax for a really long time.
B. Wax yourself at home. You can use hot wax or cold. This is a great option for a person who is related to Sasquatch (like me). I have to wax every couple of days. I can't make it to the salon that often. I suggest that you buy a small roll on hot wax machine.
This is a great little machine that only costs 15 bucks. You can get it at Sally Beauty supply. I am sure you have a Sally close to you but here is their website just in case: www.sallybeauty.com. I like this wax machine because it is small and very easy to use. It heats up in 15 minutes. You can also get it as a portable but it's about 50 bucks. Having a small wax machine is so much easier than messing around with microwave wax. You won't have as much mess.

You probably need some tips on how to use this. Here are some easy directions:
1. Heat up wax and lay you materials out on a paper towel. You will need wax removal strips, pre- waxing cleanser, wax remover, aloe vera and cotton pads. Clean and easy makes all these products.
2.Apply the wax in the direction the hair grows. (Sometimes this is down and not across.) You only need a small amount. It should glide right on or it is not hot enough. 
3. Apply the wax strip directly on top of the hot wax. Smooth the strip down in the same pattern you used to apply the wax (in the direction the hair grows).
4.Pull the skin taut around the area waxing with one hand and quickly rip the wax strip off with the other hand. Pull off in the opposite direction you applied (opposite of the hair growth). Use a fast punching motion.
5.Apply pressure to the area.
6.Use wax remover to cleanse the area.
7. Apply Aloe Vera.

The End

. You can also use cold wax strips. I love the Parissa wax strips.
These strips come in a variety of sizes and are really easy to use. Hot wax will always give the cleaner wax but these are a nice option if you don't want to mess around with hot wax. 
 
D. You can tweeze like crazy when you are stopped at a red light.

Good luck and let me know how it goes.

Sunday, July 17, 2011

Playing With Eye Color


One of the questions I get the most is, "What color of eyeshadow should I wear? What would match my skin tone." Because I am a Colorist the answer is obvious to me: ANY COLOR!
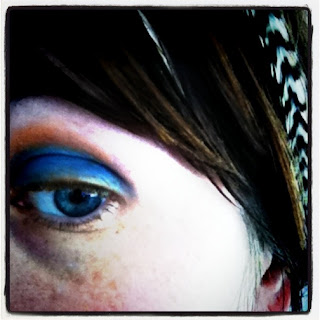
I love every color on any eye. The trick is knowing how much color and where. This week I felt like experimenting with colors that usually neutralize each other because they sit opposite on the color wheel. Red/Green, Yellow/Purple and Blue/Orange.

Here is Purple/Yellow. As you can see I used a really bright yellow. I used an angled brush and applied right on the upper lid line. I kept it out of the corner of the eye so it wouldn't be too much.On the rest of the eye I used a wide eyeshadow brush and worked to the outer corner of the eye. 
I love the bright red. This is a really bold look. I used a dark green all over the lid. The red is used to line the upper and lower lids. I did use the Smashbox lid primer. It isn't organic or natural but it gets the job done.
Here is a really soft eye using Blue/Orange. I used a really bright blue on the lid and stippled a bright orange in to the crease. I didn't use any liner or mascara to give it a softer appearance.
I can never get enough color!

Sunday, July 10, 2011

Skincare with Frangipani and Olives

I am really happy with my skin right now. I get compliments frequently and it makes me feel like a goddess. I am sure it is because I am using all natural products. Not to mention the fact that the Goddess Athena came to me in a dream and told me that the oil of the Olive was the secret to eternal youth.
Would you like to know my secrets?
This little bottle on the left is my ambrosia from Athena. I must tell you that my wonderful friend Crunchy Candid gave this to me to try. If you haven't yet you should check out her blog because it is majestic. www.crunchycandid.blogspot.com.

This little jar is filled with 80% Olive Oil and 20% Castor Oil. I will be omitting the Castor Oil in my next batch and replacing it with a different oil because of the human health risk involved in harvesting the Castor Oil beans. (If you are using Castor Oil I encourage you to do some research before you buy more.)

I use this mixture every time I bathe. I massage it in to my skin and steam it with a very hot washcloth several times before washing it off. You would think that using Olive Oil would be bad for oily skin but it isn't. It cleanses the skin and leaves it feeling supple and smooth.
In between showers or baths I use Frangipani's Refreshing Face Wash. I met the woman who makes and sells the Frangipani products at the IBS beauty show in January. She started creating cosmetics out of need for skin care for her extremely sensitive skin. They are made in very small batches near her home in Indianapolis, IN. Although not organic, all the Fragapini products are made from natural ingredients. You can read more about Frangipani at frangipanibodyproducts.com.

Here is what their website had to say about the Refreshing Face wash:

"This gentle face wash combines the cleansing properties of castile soap with the gentle, pampering of neroli and rose geranium infused floral waters. The great smell and clean feeling you have after using this product will stay with you all day!"

 The little tub above is Shea Butter Softening Lotion and it is a little bit of heaven.
Initially, I was scared to use it because it is so thick. (You have to take a tiny amount and rub it in your hands until it warms up and it thins out a bit.) I use it on my face every day. I use it on my hands and lips. I use it to brighten up my tattoos. It's wonderful and it smells like Geraniums. Here is what the Frangipani website had to say about it:
"Shea butter is one of my favorite ingredients. It softens skin like no other! The calming essential oils in this lotion are perfect for skin that suffers from acne, rosacea, or any other irritant."
Try what I use!
Mary